Quick Start Guide
This tutorial guides you through experiencing HybridCLR hot updates starting from an empty project. For simplicity, we will only demonstrate with BuildTarget set to Windows or MacOS Standalone platforms.
Please ensure the hot update process works correctly on the Standalone platform before trying it on Android or iOS platforms, as their processes are very similar.
Learning Objectives
- Create a hot update assembly
- Load the hot update assembly and execute its hot update code to print
Hello, HybridCLR - Modify the hot update code to print
Hello, World
Environment Setup
Installing Unity
HybridCLR supports all LTS versions of Unity from 2019 to 6000. If your current version is not among the recommended versions below, please refer to the Installing HybridCLR documentation.
- Install any of the following versions: 2019.4.40, 2020.3.26+, 2021.3.0+, 2022.3.0+, 6000.0.0+
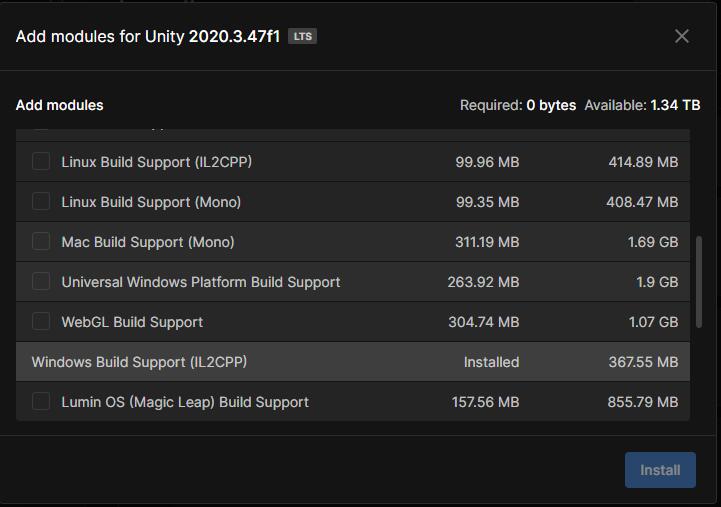
- When selecting modules during installation based on your operating system, you must select
Windows Build Support(IL2CPP)orMac Build Support(IL2CPP).
Install IDE and Related Build Environment
- Windows
- On Windows, you need to install
Visual Studio 2019or higher. The installation must include at leastGame development with UnityandGame development with C++components. - Install git
- On Windows, you need to install
- Mac
- Requires macOS version >= 12, Xcode version >= 13, for example
Xcode 13.4.1, macOS 12.4. - Install git
- Requires macOS version >= 12, Xcode version >= 13, for example
Installing HybridCLR
Install the com.code-philosophy.hybridclr Package
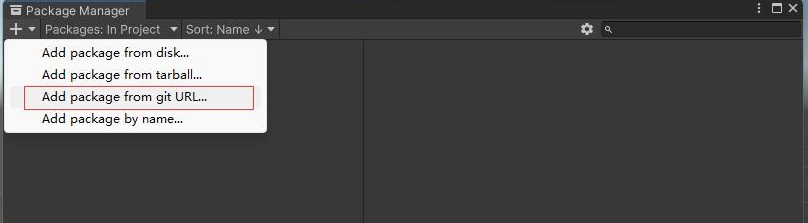
Open the Package Manager by clicking Windows/Package Manager in the main menu. Click Add package from git URL... as shown in the image below, and enter https://gitee.com/focus-creative-games/hybridclr_unity.git or https://github.com/focus-creative-games/hybridclr_unity.git.
If you're unfamiliar with installing packages from URLs, please see install from giturl.
Due to network issues in China, you may encounter network exceptions that prevent installation in Unity. You can first clone or download com.code-philosophy.hybridclr locally, rename the folder to com.code-philosophy.hybridclr, and move it directly to the project's Packages directory.
Initialize com.code-philosophy.hybridclr
Open the menu HybridCLR/Installer..., click the Install button to install. Wait patiently for about 30 seconds. After installation is complete, it will print an Installation Successful log at the end.
Initialize Unity Hot Update Project
The process of building a hot update project from scratch is quite lengthy. You can refer to the hybridclr_trial project for project structure, resources, and code. Its repository is available at github or gitee.
Create Project
Create an empty Unity project.
Create ConsoleToScreen.cs Script
This script doesn't directly contribute to the hot update demonstration. It can print logs to the screen, making it easier to locate errors.
Create the Assets/ConsoleToScreen.cs script class with the following code:
using System;
using System.Collections;
using System.Collections.Generic;
using UnityEngine;

public class ConsoleToScreen : MonoBehaviour
{
    const int maxLines = 50;
    const int maxLineLength = 120;
    private string _logStr = "";

    private readonly List<string> _lines = new List<string>();

    public int fontSize = 15;

    void OnEnable() { Application.logMessageReceived += Log; }
    void OnDisable() { Application.logMessageReceived -= Log; }

    public void Log(string logString, string stackTrace, LogType type)
    {
        foreach (var line in logString.Split('\n'))
        {
            if (line.Length <= maxLineLength)
            {
                _lines.Add(line);
                continue;
            }
            var lineCount = line.Length / maxLineLength + 1;
            for (int i = 0; i < lineCount; i++)
            {
                if ((i + 1) * maxLineLength <= line.Length)
                {
                    _lines.Add(line.Substring(i * maxLineLength, maxLineLength));
                }
                else
                {
                    _lines.Add(line.Substring(i * maxLineLength, line.Length - i * maxLineLength));
                }
            }
        }
        if (_lines.Count > maxLines)
        {
            _lines.RemoveRange(0, _lines.Count - maxLines);
        }
        _logStr = string.Join("\n", _lines);
    }

    void OnGUI()
    {
        GUI.matrix = Matrix4x4.TRS(Vector3.zero, Quaternion.identity,
           new Vector3(Screen.width / 1200.0f, Screen.height / 800.0f, 1.0f));
        GUI.Label(new Rect(10, 10, 800, 370), _logStr, new GUIStyle() { fontSize = Math.Max(10, fontSize) });
    }
}
Create Main Scene
- Create default initial scene main.scene
- Create an empty GameObject in the scene and attach ConsoleToScreen to it
- Add main scene to the packaging scene list in
Build Settings
Create HotUpdate Hot Update Module
- Create
Assets/HotUpdatedirectory - Right-click in the directory
Create/Assembly Definition, create an assembly module namedHotUpdatetipIf your project uses Assembly-CSharp as an AOT assembly, it is strongly recommended to disable the
auto referenceoption for hot update assemblies. Because Assembly-CSharp is the top-level assembly, enabling this option will automatically reference all remaining assemblies, including hot update assemblies, making it easy to mistakenly reference hot update assemblies and cause packaging failures.
Configure HybridCLR
Configure HybridCLR
Open the menu HybridCLR/Settings, and add the HotUpdate assembly in the Hot Update Assemblies configuration item, as shown in the figure below:

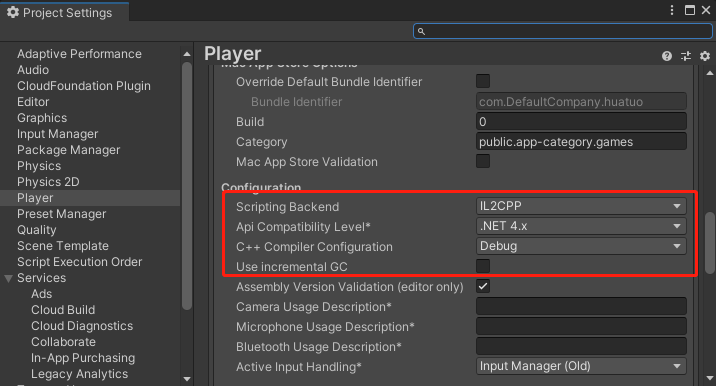
Configure PlayerSettings
- If you are using hybridclr package lower than v4.0.0, you need to disable the Use Incremental GC option
- Switch
Scripting BackendtoIL2CPP - Switch
Api Compatability Levelto.Net 4.x(Unity 2019-2020) or.Net Framework(Unity 2021+)
Create hot update script
Create the Assets/HotUpdate/Hello.cs file with the following code content
using System.Collections;
using UnityEngine;

public class Hello
{
    public static void Run()
    {
        Debug.Log("Hello, HybridCLR");
    }
}
You might be concerned about whether the hot update code has syntax restrictions like other solutions. HybridCLR is a nearly complete implementation with almost no restrictions on hot update code. The very few exceptions can be viewed in Unsupported Features.
Load hot update assembly
To simplify the demonstration, we don't download HotUpdate.dll through an HTTP server, but directly place HotUpdate.dll in the StreamingAssets directory.
HybridCLR is a native runtime implementation, so calling Assembly Assembly.Load(byte[]) can load hot update assemblies.
Create the Assets/LoadDll.cs script, then create a GameObject object in the main scene and attach the LoadDll script.
using HybridCLR;
using System;
using System.Collections;
using System.Collections.Generic;
using System.IO;
using System.Linq;
using System.Reflection;
using System.Threading.Tasks;
using UnityEngine;
using UnityEngine.Networking;

public class LoadDll : MonoBehaviour
{

    void Start()
    {
      // In Editor environment, HotUpdate.dll.bytes has been automatically loaded, no need to load again, repeated loading will cause problems.
#if !UNITY_EDITOR
        Assembly hotUpdateAss = Assembly.Load(File.ReadAllBytes($"{Application.streamingAssetsPath}/HotUpdate.dll.bytes"));
#else
      // In Editor environment, no need to load, directly search and get the HotUpdate assembly
        Assembly hotUpdateAss = System.AppDomain.CurrentDomain.GetAssemblies().First(a => a.GetName().Name == "HotUpdate");
#endif
    }
}
Call hot update code
Obviously, the main project cannot directly reference hot update code. There are multiple ways to call code in hot update assemblies from the main project. Here we call hot update code through reflection.
Add reflection call code after the LoadDll.Start function. The final code is as follows:
    void Start()
    {
      // In Editor environment, HotUpdate.dll.bytes has been automatically loaded, no need to load again, repeated loading will cause problems.
#if !UNITY_EDITOR
        Assembly hotUpdateAss = Assembly.Load(File.ReadAllBytes($"{Application.streamingAssetsPath}/HotUpdate.dll.bytes"));
#else
      // In Editor environment, no need to load, directly search and get the HotUpdate assembly
        Assembly hotUpdateAss = System.AppDomain.CurrentDomain.GetAssemblies().First(a => a.GetName().Name == "HotUpdate");
#endif

        Type type = hotUpdateAss.GetType("Hello");
        type.GetMethod("Run").Invoke(null, null);
    }
At this point, the entire hot update project creation is complete!!!
Test run in Editor
Run the main scene, and 'Hello,HybridCLR' will be displayed on the screen, indicating that the code is working properly.
Build and run
- Run the menu
HybridCLR/Generate/Allto perform necessary generation operations. This step is essential!!! - Copy HotUpdate.dll from the
{proj}/HybridCLRData/HotUpdateDlls/StandaloneWindows64(orStandaloneMacXxxon macOS) directory toAssets/StreamingAssets/HotUpdate.dll.bytes. Note that you must add the.bytessuffix!!! - Open the
Build Settingsdialog, clickBuild And Runto package and run the hot update example project. - Open the
Build Settingsdialog, clickBuild And Runto package and run the hot update example project.
If packaging is successful and 'Hello,HybridCLR' is displayed on the screen, it means the hot update code has been executed successfully!
Test hot update
- Modify the
Debug.Log("Hello, HybridCLR");code in the Run function ofAssets/HotUpdate/Hello.cstoDebug.Log("Hello, World");. - Run the menu command
HybridCLR/CompileDll/ActiveBulidTargetto recompile the hot update code. - Copy the HotUpdate.dll from the
{proj}/HybridCLRData/HotUpdateDlls/StandaloneWindows64(orStandaloneMacXxxon macOS) directory to the packaged output directory asXXX_Data/StreamingAssets/HotUpdate.dll.bytes. - Re-run the program, and you will see
Hello, Worlddisplayed on the screen, indicating that the hot update code has taken effect!
This completes the hot update experience!!!