Quick Start
Before attempting hot updates on Android or iOS platforms, ensure that the hot update workflow is successfully running on Win64 or MacOS Standalone platforms.
The flagship version has a similar level of complexity to the community version, with most principles being the same. It is recommended to familiarize yourself with the community version before trying the flagship version.
Installing Unity, IDE, and Related SDKs
This step is identical to the community version. For detailed instructions, see Installing HybridCLR.
Creating a Unity Hot Update Project from Scratch
Creating a hot update project from scratch is a lengthy process. The code involved in the following steps can be referenced from the dhe_demo project, which is available at GitHub.
Creating the Project
Create an empty Unity project.
Installing HybridCLR
- Extract
hybridclr_unity.zipand place it in the project'sPackagesdirectory, renaming it tocom.code-philosophy.hybridclr. - Extract the corresponding
il2cpp_plus-{version}.zipbased on your Unity version. - Extract
hybridclr.zip. - Place the
hybridclrdirectory fromhybridclr.zipinto thelibil2cppdirectory extracted fromil2cpp-{version}.zip. Ensure that the filelibil2cpp\hybridclr\RuntimeApi.cppexists; otherwise, thehybridclrdirectory is misplaced. - Open
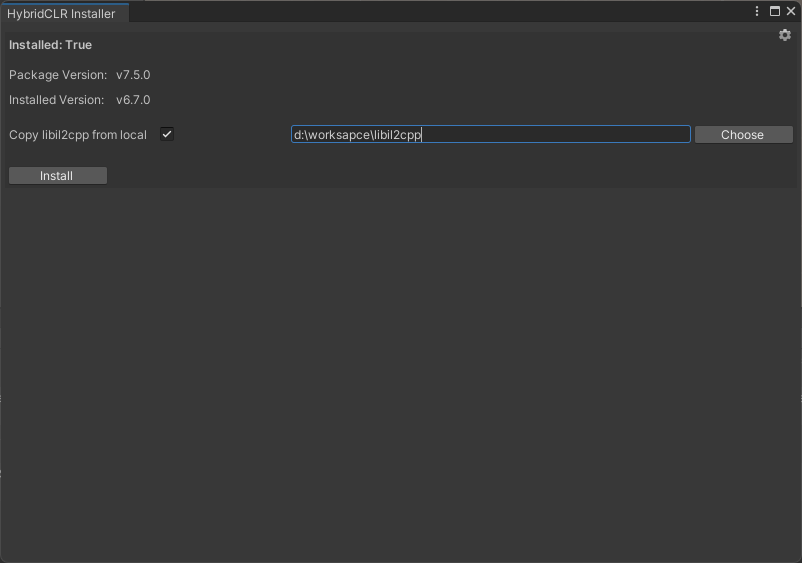
HybridCLR/Installer, enable theCopy libil2cpp from localoption, select the extractedlibil2cppdirectory, and proceed with the installation. - Depending on your Unity version:
- If version >= 2023:
- First install Unity 2022.3.60f1
- Copy the
2022.3.60f1\Editor\Data\il2cpp\build\deploydirectory to{proj}\HybridCLRData\LocalIl2CppData-WindowsEditor\il2cpp\build\deploy\deploy-2022 - Replace
{proj}\HybridCLRData\LocalIl2CppData-WindowsEditor\il2cpp\build\deploy\deploy-2022\Unity.IL2CPP.dllwith the fileModifiedDlls\2022.3.60f1\Unity.IL2CPP.dll
- If version >= 2021: Replace
{proj}\HybridCLRData\LocalIl2CppData-WindowsEditor\il2cpp\build\deploy\Unity.IL2CPP.dllwithModifiedDlls\{verions}\Unity.IL2CPP.dll - If version >= 2020: Replace
{proj}\HybridCLRData\LocalIl2CppData-WindowsEditor\il2cpp\build\deploy\netcoreapp3.1\Unity.IL2CPP.dllwithModifiedDlls\{verions}\Unity.IL2CPP.dll - If version 2019: No action required, as files are automatically copied during installation
- If version >= 2023:
(Note: {proj} represents your project root path, and {verions} should match your specific Unity version number)
Configuring PlayerSettings
- Switch the
Scripting BackendtoIL2CPP. - Change the
Api Compatibility Levelto.Net 4.x(for Unity 2019-2020) or.Net Framework(for Unity 2021+).

Creating the Main Scene
- Create a default initial scene named
main.scene. - Add the
mainscene to the build scene list in theBuild Settings.
Creating the HotUpdate Module
- Create the
Assets/HotUpdatedirectory. - Right-click in the directory and select
Create/Assembly Definitionto create an assembly module namedHotUpdate.
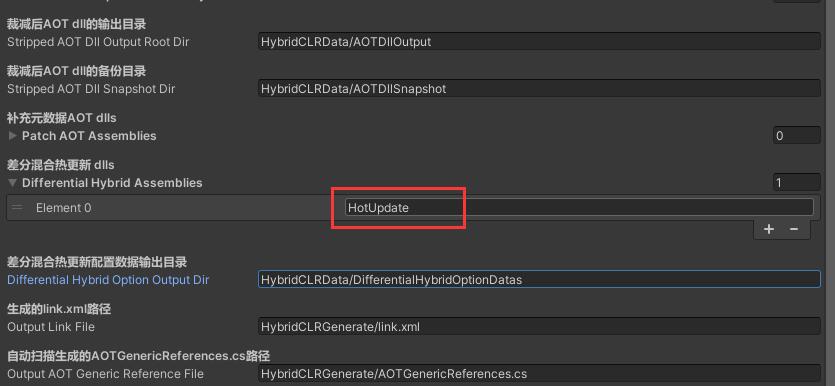
Configuring HybridCLR
- Open the menu
HybridCLR/Settings. - Add the
HotUpdateassembly to thedifferentialHybridAssemblieslist.
Creating Editor Scripts
Create a BuildTools.cs file in the Assets/Editor directory with the following content:
using HybridCLR.Editor;
using HybridCLR.Editor.DHE;
using HybridCLR.Runtime;
using System.Collections;
using System.Collections.Generic;
using System.IO;
using UnityEditor;
using UnityEngine;

public static class BuildTools
{
    public static string GetAOTSnapshotDir(BuildTarget target)
    {
        return $"{SettingsUtil.HybridCLRDataDir}/Snapshot/{target}";
    }

    [MenuItem("Build/CreateAotSnapshot")]
    public static void CreateAOTSnapshot()
    {
        BuildTarget target = EditorUserBuildSettings.activeBuildTarget;
        string snapshotDir = GetAOTSnapshotDir(target);
        MetaVersionWorkflow.CreateAotSnapshot(target, snapshotDir);

        MetaVersionWorkflow.GenerateAotSnapshotMetaVersionFiles(null, snapshotDir);
    }

    //[MenuItem("Build/GenerateHotUpdateMetaVersionFiles")]
    public static void GenerateHotUpdateMetaVersionFiles()
    {
        BuildTarget target = EditorUserBuildSettings.activeBuildTarget;
        GenerateHotUpdateMetaVersionFiles(target);
    }

    public static void GenerateHotUpdateMetaVersionFiles(BuildTarget target)
    {
        var latestSnapshotSolutionDir = GetAOTSnapshotDir(target);
        var newHotUpdateSolutionDir = SettingsUtil.GetHotUpdateDllsOutputDirByTarget(target);
        MetaVersionWorkflow.GenerateHotUpdateMetaVersionFiles(latestSnapshotSolutionDir, newHotUpdateSolutionDir);
    }

    [MenuItem("Build/CompileAndGenerateHotUpdateMetaVersionFiles")]
    public static void CompileAndGenerateHotUpdateMetaVersionFiles()
    {
        CompileDllCommand.CompileDllActiveBuildTarget();
        GenerateHotUpdateMetaVersionFiles();
    }

    private static void CopyOriginalMetaVersions(string originalMetaVersionDir, string outputMetaVersionDir)
    {
        Directory.CreateDirectory(outputMetaVersionDir);
        foreach (var dll in SettingsUtil.DifferentialHybridAssemblyNames)
        {
            string srcMetaVersionFile = $"{originalMetaVersionDir}/{dll}.mv.bytes";
            string dstMetaVersionFile = $"{outputMetaVersionDir}/{dll}.mv.bytes";
            System.IO.File.Copy(srcMetaVersionFile, dstMetaVersionFile, true);
            Debug.Log($"Copy: {srcMetaVersionFile} -> {dstMetaVersionFile}");
        }
    }

    [MenuItem("Build/CopyHotUpdateDllAndMetaVersionFilesToHotUpdateDataDir")]
    public static void CopyHotUpdateDllAndMetaVersionFilesToHotUpdateDataDir()
    {
        BuildTarget target = EditorUserBuildSettings.activeBuildTarget;
        string outputHotUpdateResDir = $"{Application.dataPath}/../HotUpdateSnapshot/{target}";
        BashUtil.RecreateDir(outputHotUpdateResDir);

        // Copy OriginalMetaVersions
        // For convenience in the demo project, this directory is copied only during hot update release.
        // In actual projects, it is recommended to copy this directory to the StreamingAssets directory during CreateAotSnapshot and release it with the package.
        CopyOriginalMetaVersions(Snapshot.GetMetaVersionDir(GetAOTSnapshotDir(target)), $"{outputHotUpdateResDir}/OriginalMetaVersions");

        // Copy HotUpdate dlls and meta version files
        string hotUpdateSnapshotDir = SettingsUtil.GetHotUpdateDllsOutputDirByTarget(target);
        foreach (var dll in SettingsUtil.DifferentialHybridAssemblyNames)
        {
            // copy dll
            string srcFile = $"{hotUpdateSnapshotDir}/{dll}.dll";
            string dstFile = $"{outputHotUpdateResDir}/{dll}.dll.bytes";
            System.IO.File.Copy(srcFile, dstFile, true);
            Debug.Log($"Copy: {srcFile} -> {dstFile}");

            // copy MetaVersion files
            string srcMetaVersionFile = $"{Snapshot.GetMetaVersionDir(hotUpdateSnapshotDir)}/{dll}.mv.bytes";
            string dstMetaVersionFile = $"{outputHotUpdateResDir}/{dll}.mv.bytes";
            System.IO.File.Copy(srcMetaVersionFile, dstMetaVersionFile, true);
            Debug.Log($"Copy: {srcMetaVersionFile} -> {dstMetaVersionFile}");
        }
    }
}
Creating Hot Update Scripts
Create a Hello.cs file in Assets/HotUpdate with the following content:
using System.Collections;
using UnityEngine;

public class Hello
{
    public static void Run()
    {
        // Original code
        Debug.Log("Hello, World");
        // After hot update, change to:
        // Debug.Log("Hello, HybridCLR");
    }
}
Loading Hot Update Assemblies
For simplicity, we will not download HotUpdate.dll via an HTTP server but instead place it directly in the StreamingAssets directory.
Create a LoadDll.cs script in Assets and attach it to a GameObject in the main scene.
using HybridCLR;
using System;
using System.Collections;
using System.Collections.Generic;
using System.IO;
using System.Linq;
using System.Reflection;
using System.Security.Cryptography;
using System.Text;
using System.Threading.Tasks;
using UnityEngine;
using UnityEngine.Networking;

public class LoadDll : MonoBehaviour
{
    void Start()
    {
        // In Editor mode, HotUpdate.dll.bytes is automatically loaded and does not need to be loaded again; attempting to reload it will cause issues.
#if !UNITY_EDITOR
        LoadDifferentialHybridAssembly("HotUpdate");
#endif
        Assembly hotUpdateAss = System.AppDomain.CurrentDomain.GetAssemblies().First(a => a.GetName().Name == "HotUpdate");
        Type helloType = hotUpdateAss.GetType("Hello");
        MethodInfo runMethod = helloType.GetMethod("Run");
        runMethod.Invoke(null, null);
    }

    private void LoadDifferentialHybridAssembly(string assName)
    {
        string assFile = $"{Application.streamingAssetsPath}/{assName}.dll.bytes";
        // If the file does not exist, use the original AOT assembly
        if (!File.Exists(assFile))
        {
            LoadImageErrorCode err = RuntimeApi.LoadOriginalDifferentialHybridAssembly(assName);
            if (err == LoadImageErrorCode.OK)
            {
                Debug.Log($"LoadOriginalDifferentialHybridAssembly {assName} OK");
            }
            else
            {
                Debug.LogError($"LoadOriginalDifferentialHybridAssembly {assName} failed, err={err}");
            }
        }
        else
        {
            byte[] dllBytes = File.ReadAllBytes($"{Application.streamingAssetsPath}/{assName}.dll.bytes");
            byte[] currentMetaVersionBytes = File.ReadAllBytes($"{Application.streamingAssetsPath}/{assName}.mv.bytes");
            byte[] originalMetaVersionBytes = File.ReadAllBytes($"{Application.streamingAssetsPath}/OriginalMetaVersions/{assName}.mv.bytes");
            LoadImageErrorCode err = RuntimeApi.LoadDifferentialHybridAssemblyWithMetaVersion(dllBytes,
                null,
                originalMetaVersionBytes,
                currentMetaVersionBytes
                );
            if (err == LoadImageErrorCode.OK)
            {
                Debug.Log($"LoadDifferentialHybridAssembly {assName} OK");
            }
            else
            {
                Debug.LogError($"LoadDifferentialHybridAssembly {assName} failed, err={err}");
            }
        }
    }
}
With this, the entire hot update project setup is complete!
Testing in the Editor
Run the main scene, and Console window will show log Hello, World, indicating that the code is working correctly.
Building the Game
- Run the menu item
HybridCLR/Generate/Allto perform necessary generation operations. This step is mandatory!!! - Open the
Build Settingsdialog, clickBuild, select the output directory{build}, and proceed with the build. - Run
Build/CreateAotSnapshotto create the AOT snapshot for the build. This step must be performed afterBuild, as the AOT snapshot must copy the DLLs generated during the build, not those generated byHybridCLR/Generate/All.
The AOT snapshot created by CreateAotSnapshot contains the following:
- All AOT DLLs
- InjectRules files, placed in the
InjectRulesdirectory - Meta version files for the AOT DLLs, placed in the
MetaVersionsdirectory manifest.json, which primarily records the list of DHE assembliessignature-mapper.json
The AOT snapshot directory created by Build/CreateAotSnapshot should be added to version control, as it is used to generate meta version files for future hot update DLLs.
Initial Package Testing
- Run
{build}/Xxx.exe, and Player Log file will contain logHello, World, indicating that the original code is executed!
Testing Hot Updates
- Ensure that the
Build/CreateAotSnapshotstep has been executed during the game build process. Run it once and avoid running it multiple times. - Modify the
Hello::Runfunction by changingDebug.Log("Hello, World")toDebug.Log("Hello, HybridCLR"). - Run
Build/CompileAndGenerateHotUpdateMetaVersionFilesto generate the hot update DLL and corresponding meta version files. - Run
Build/CopyHotUpdateDllAndMetaVersionFilesToHotUpdateDataDir. This will copy the hot update DLL and meta version files to the{proj}/HotUpdateSnapshot/{buildTarget}directory. - Manually copy all files from the
{proj}/HotUpdateSnapshot/{buildTarget}directory to the{build}\StreamingAssetsdirectory. - Run the application again, and Player Log file will contain log
Hello, HybridCLR.
With this, the hot update process is complete!